Earning your Commercial Driver’s License (CDL) requires learning many important skills, but one of the most critical topics is understanding the CDL air brake system. This knowledge is not just an additional qualification—it is a fundamental requirement for operating most heavy-duty commercial vehicles. Without passing the air brake portion of the CDL exam, many driving opportunities in the trucking industry will not be available.
Why the Air Brake Endorsement Matters
To understand why air brakes are so important, consider how braking systems work in a typical passenger vehicle. Cars rely on hydraulic braking systems that use fluid pressure to stop vehicles weighing a few thousand pounds. However, that same system would not be powerful enough to safely stop a fully loaded tractor-trailer weighing up to 80,000 pounds.
For this reason, commercial trucks use air brake systems, which provide the strength and reliability required for heavy vehicles. Because these systems are more complex, professional drivers must understand how they operate and how to inspect them properly. Learning how air brakes function is essential not only for passing the CDL written test but also for successfully completing the practical skills examination.
The Importance of Brake Safety
In commercial trucking, few systems are more important than the brakes. Properly functioning brakes are essential for maintaining control of large vehicles, especially when operating at highway speeds or transporting heavy loads. When braking systems fail or are not maintained correctly, the consequences can be severe.
Safety inspections regularly highlight the importance of brake maintenance. During a recent large-scale roadside inspection event across North America, defective service brakes were identified as the most common reason for vehicles being placed out of service. Approximately 25% of all out-of-service violations were related to brake system problems.
This statistic demonstrates how important it is for drivers to understand their air brake systems thoroughly. Knowledge of the system helps drivers identify problems early and ensures that vehicles remain safe to operate on the road.
A Key Requirement for Professional Drivers
Federal regulations require drivers to obtain an air brake endorsement if they plan to operate commercial vehicles equipped with air brake systems. Without this qualification, a driver’s CDL will include a restriction that prevents them from operating most heavy-duty trucks.
Because of this requirement, mastering the air brake system is a crucial step toward building a successful trucking career. Understanding how the system works, how to inspect it, and how to respond to potential issues ensures that drivers are prepared to operate commercial vehicles safely and professionally.
To better understand what the air brake endorsement includes and why it is so important, let’s review the main topics covered in this section of the CDL exam.
Air Brake Endorsement At a Glance
| Requirement | Why It Matters | Vehicles Affected | Consequence of No Endorsement |
|---|---|---|---|
| Pass a specialized knowledge test on air brake systems. | Ensures you understand the components, operation, and inspection procedures for air brakes. | Most Class A tractor-trailers, Class B straight trucks (dump trucks, buses), and some larger Class C vehicles. | You receive an “L” restriction on your CDL, legally preventing you from operating any vehicle with air brakes. |
| Pass a practical skills test (pre-trip inspection) on an air brake-equipped vehicle. | Proves you can identify and test critical air brake components in a real-world setting. | Any commercial vehicle used for the CDL skills test that is equipped with air brakes. | You get an “L” restriction, severely limiting your job opportunities to smaller, non-air brake vehicles. |
As you can see, skipping this endorsement puts a major roadblock in your career path. Without it, you’re cut off from driving most:
- Tractor-trailers (Class A)
- Dump trucks and buses (Class B)
- Heavy-duty straight trucks
In short, learning the CDL air brake system is one of the first and most important steps in your career. It has a direct impact on your job security, your safety record, and how much you can earn. For a deeper dive into what it takes to get licensed, check out our full guide on CDL requirements. This knowledge isn’t just for the test; it’s your first line of defense out on the open road.
How Your Air Brake System Actually Works
To really get a handle on a commercial vehicle’s air brake system, it helps to stop thinking of it as one single part. It’s actually a network of three systems working together, kind of like the circulatory system in your body. If you break it down into these smaller parts, the whole thing becomes much less intimidating.
The three main circuits in any CDL air brake setup are the supply system, the service system, and the emergency system. Each one has a very specific job, but they all run on compressed air. This is the biggest difference compared to the hydraulic fluid you’d find in the different types of car brakes on your personal car.
The Heart and Lungs of the System
Think of the air compressor as the heart. Its only job is to pump air into the system. That air travels through lines (like veins) and gets stored in the air tanks, which act like the lungs. They hold the compressed air under high pressure until you need it.
To keep things from getting out of hand, the air compressor governor acts as the brain of this operation. It tells the compressor when to kick on (usually around 100 psi) and when to turn off once the tanks are full (around 125 psi). This simple but critical cycle makes sure there’s always enough power on tap to stop a rig weighing tens of thousands of pounds.
Putting That Stored Air to Work
Once the air tanks are charged, the service and emergency systems are ready to do their jobs. Here’s a quick rundown of what each system does:
- The Supply System: This is the power plant. It’s made up of the compressor, governor, and storage tanks. Its one and only mission is to produce and store a ready supply of clean, dry air.
- The Service Brake System: This is the system you use every time you hit the brakes. When you press the brake pedal (also called a treadle valve), you’re not physically pushing fluid. You’re simply opening a valve that lets that stored air rush to the brake chambers on each wheel, which then applies the brakes.
- The Emergency Brake System: Here’s where the genius of air brakes really shows. This system is a built-in fail-safe. It uses incredibly powerful springs to keep the brakes applied by default. It’s actually air pressure that works to hold these springs back. If you lose air pressure and it drops too low (somewhere between 20-45 psi), those springs automatically take over and bring the vehicle to a stop.
The single most important thing to understand is that a CDL air brake system is designed to fail-safe. A total loss of air pressure doesn’t mean you lose your brakes—it means the brakes come on. This is a fundamental safety design every driver needs to burn into their memory.
The Parts That Do the Heavy Lifting
While the systems are the brains, a few key components provide the muscle. At each wheel, you have brake chambers, which house a rubber diaphragm. When you hit the brakes, air pushes on this diaphragm.
That force moves a pushrod, which is connected to a slack adjuster. The slack adjuster then turns a component called an s-cam, which forces the brake shoes out against the inside of the brake drum. That friction is what stops the wheel.
Knowing how all these pieces fit together isn’t just about passing the test. It’s what turns your pre-trip inspection from a checklist you memorize into a real diagnostic tool. It gives you the power to spot a small problem before it becomes a major disaster on the highway.
Your Complete Air Brake Pre-Trip Inspection Checklist
Passing the hands-on part of the CDL air brake test really comes down to one thing: a flawless pre-trip inspection. The examiner needs to see more than just you pushing buttons and pulling knobs. They’re looking for a driver who can walk them through a logical, step-by-step process, explaining what they’re doing—and why—every step of the way. Think of this checklist as your script.
To really nail it, it helps to understand that the whole system is basically three circuits working together. The supply circuit makes and stores the air, the service circuit is what you use every time you hit the brake pedal in normal driving, and the emergency circuit is your ultimate fail-safe.
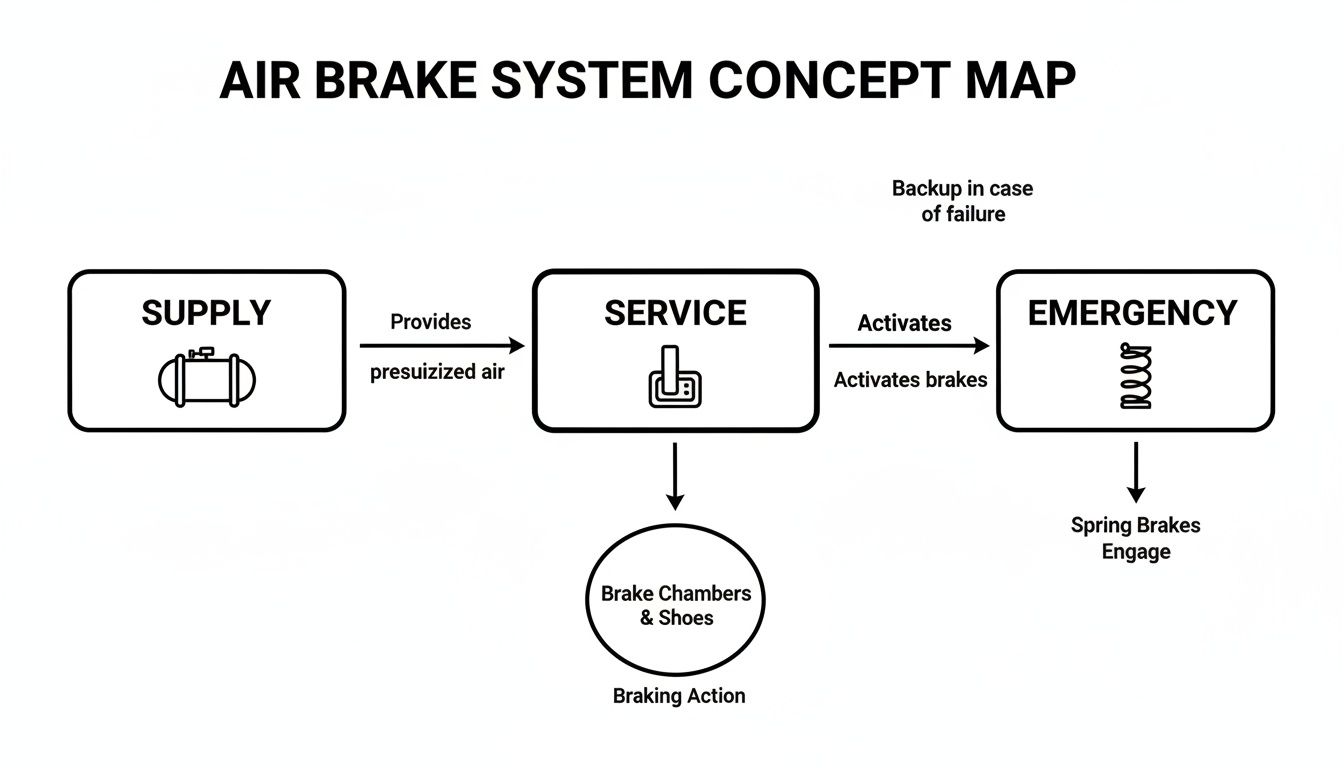
This map gives you a good visual of how all three circuits connect to make sure a rig can stop safely, no matter what. Now, let’s get into the exact sequence your examiner is expecting to see.
Step 1: Governor Cut-In and Cut-Out Test
This first check is all about making sure your air compressor and governor are playing nicely together. You’ll start with the engine running and let the air pressure build until the governor “cuts out,” which stops the compressor. You should hear a distinct pssshhh from the air dryer when this happens.
- Governor Cut-Out: The pressure must stop climbing before it hits 140 psi. On most trucks, this happens right around 125 psi.
- Governor Cut-In: Now, you’ll start “fanning” the brake pedal—just press and release it a few times to drop the pressure. The compressor has to kick back on, or “cut in,” at or above 100 psi.
Step 2: The Air Leakage Tests
Once the governor check is done, it’s time for two incredibly important leak tests. These prove your system can hold its air, which is absolutely critical out on the road. Remember to release the parking brake for this part. For a deeper dive into all vehicle checks, our complete pre-trip inspection guide has you covered.
Static Leak Test:
First, shut the engine off but leave the key on, and make sure the parking brake is released. Let the air gauges settle for a moment. Once they’re stable, you’re on the clock. You cannot lose more than 2 psi in one minute for a straight truck or 3 psi for a combination vehicle.
Applied Leak Test:
Right after the static test, you’ll push the brake pedal down and hold it firmly. Again, watch the needles settle. With steady pressure on the pedal, the system can’t lose more than 3 psi in one minute for a straight truck or 4 psi for a combination vehicle.
Examiner Tip: Talk your way through it. Actually say, “I am now beginning my one-minute applied leak test.” Announce your starting pressure and your ending pressure. This shows the examiner you’re confident and know precisely what you’re testing.
Step 3: Low Air Warning and Spring Brake Test
This final part of the in-cab inspection checks the truck’s built-in safety alerts. These are the alarms and automatic brakes that protect you if you ever have a serious air loss.
- Low Air Warning: With the key still on (engine off), keep fanning the brake pedal. Your low-air warning light and buzzer must come on at or above 55 psi.
- Spring Brakes: Continue fanning the brakes down. Between 20 and 45 psi, the parking brake knob—the yellow one—should pop out on its own. That’s the spring brakes automatically engaging.
Once you’ve demonstrated all of these steps, in order, you’ve aced the in-cab air brake inspection. Of course, if your inspection turns up any real problems, finding professional brake repair and service is the next critical step to make sure the vehicle is safe for the road.
Passing the Written CDL Air Brake Knowledge Test
Before you can even think about getting behind the wheel for your skills test, you have to prove you know your stuff on paper. The written CDL air brake knowledge test is that first major hurdle. It’s designed to make sure you have a solid grasp of the system’s mechanics, safety checks, and operating limits—the very things that keep a multi-ton vehicle under control on the road.
This isn’t just about memorizing parts. The exam digs into your understanding of proper air pressure ranges, the concept of brake lag, and the right way to handle a long downhill grade. It’s all about the “why” behind the procedures, not just the “what.”
Focusing Your Study Efforts
Let’s be blunt: a lot of new drivers find the air brake test to be the toughest written exam they face. One statewide study found a staggering 78.3% first-attempt failure rate for new applicants, which was the highest of all endorsement tests. For drivers renewing their CDL, that number dropped to just 15.7%. That massive difference tells you one thing—getting it right the first time comes down to focused, serious studying.
So, where do you focus? The numbers. The test is loaded with questions about specific pressure readings, and you absolutely must know them cold.
The real secret to passing isn’t just skimming the manual. It’s about drilling the critical pressure ranges until they’re second nature. Flashcards, mnemonics, whatever it takes—burn these numbers into your brain because you are guaranteed to see them on the test.
For instance, you could use a simple phrase like “125 stops, 100 starts, 60 warns, 30 pops” to remember the sequence for the governor cut-out, cut-in, low-air warning, and spring brake activation. Many of the same study strategies we cover in our guide to the General Knowledge Test work perfectly here, too.
Critical Air Brake Pressure Ranges to Memorize
Think of these numbers as the vital signs of your air brake system. Knowing them instantly is non-negotiable for both the written test and the hands-on pre-trip inspection. This table lays out the core figures you must commit to memory.
| System Check | Required PSI Reading or Action | What It Tests |
|---|---|---|
| Governor Cut-Out | Must stop building pressure around 125 psi (not to exceed 140 psi) | Ensures the air compressor doesn’t over-pressurize the system. |
| Governor Cut-In | Compressor must restart at or above 100 psi | Confirms the system maintains minimum operating pressure. |
| Low Air Warning | Alarm (light and buzzer) must activate at or above 55 psi | Verifies the system provides adequate warning of low air pressure. |
| Spring Brakes | Parking brake valve pops out between 20-45 psi | Confirms the automatic engagement of the emergency braking system. |
Memorizing these values is the first step. The next is understanding what they mean in the real world. You also need to internalize concepts like brake lag—that critical delay between you hitting the pedal and the brakes actually engaging. Because air takes time to travel through the lines, this lag is much longer than in a car’s hydraulic system, and it fundamentally changes how you calculate your following distance.
Once you have both the numbers and the concepts down, you’ll walk into that testing center with the confidence you need to pass.
Common Air Brake Test Mistakes and How to Avoid Them
You can practice for hours, know the system inside and out, but test-day nerves can make you slip up on the smallest details. When it comes to the CDL air brake exam, those small details can mean an automatic failure.
The key isn’t just memorizing the steps; it’s about building rock-solid habits so you can perform perfectly when the pressure is on. Let’s walk through the most common trip-ups that instructors see time and again and make sure you don’t fall into the same traps.

Forgetting the Foundation
It sounds almost too basic to mention, but a surprising number of students dive right into the in-cab inspection without taking the single most important safety step. This is a massive red flag for any examiner.
-
Don’t Do This: Jumping in the cab and firing up the engine without chocking the wheels. If an examiner sees you start the sequence with the truck unsecured, they see a driver who overlooks fundamental safety. It’s a bad start.
-
Do This Instead: Before you even think about turning the key, always make sure your wheels are chocked. Then, make it a point to tell the examiner out loud, “My wheels are chocked, and the vehicle is secure.” It’s a simple sentence that proves safety is second nature to you.
Misstating Critical Numbers
The air brake test is a numbers game. It’s full of specific pressure values and time limits, and getting them wrong is one of the quickest ways to get sent home.
Examiner Insight: A classic failure point is mixing up the air loss rates. A student might do the static leak test perfectly but then state the wrong psi limit. That’s an immediate ding on the scoresheet.
Here’s a quick rundown of the numbers you absolutely have to nail:
| The Mistake | The Correction |
|---|---|
| Forgetting PSI Loss Limits | Recite the limits out loud as you do the test: “For this straight truck, I can’t lose more than 2 psi static or 3 psi applied in one minute.” |
| Guessing Governor Settings | Know the exact ranges and say them: “The governor must cut out by 140 psi—usually around 125 psi—and cut back in at or above 100 psi.” |
| Confusing Warning Signals | State the values with confidence: “My low-air warning must come on at or above 55 psi, and my spring brakes must pop out between 20-45 psi.” |
Failing to Narrate
Your examiner can’t read your mind. You might be performing every step flawlessly, but if you do it in silence, they have no way of knowing you understand why you’re doing it.
-
Don’t Do This: Quietly pushing buttons, pulling valves, and watching the gauges move. The examiner needs to hear your thought process to confirm you’re not just going through the motions.
-
Do This Instead: Talk through every single step. Think of yourself as a narrator. For example, announce, “Okay, I’m now applying firm pressure to the brake pedal to begin my one-minute applied air loss test. I’m watching for a loss of no more than 3 psi.” This verbal confirmation is proof of your expertise.
You can get a feel for more test scenarios by reviewing these practice air brake test materials. Turn these “Do This Instead” tips into habits, and you’ll walk into your exam with the confidence you need to pass.
Your CDL Air Brake Test Questions Answered
Even after getting a handle on the mechanics and inspection steps, you probably still have a few nagging questions about the actual CDL air brake test. That’s perfectly normal. Let’s clear up some of the most common questions drivers ask so you can walk into the testing center feeling confident and ready.
This section tackles those specific “what ifs” and “how does this work” questions head-on.
What Is the Difference Between a Restriction and an Endorsement?
Think of it this way: an endorsement adds a qualification to your CDL, while a restriction takes one away.
An air brake endorsement is the official stamp on your license that says you’ve proven you can safely operate a commercial vehicle with an air brake system. It opens doors.
On the flip side, if you take your road test in a truck that doesn’t have air brakes (like one with hydraulic brakes), you’ll get an “L” restriction placed on your CDL. This legally blocks you from driving any CMV with air brakes, which, frankly, kills your job prospects. Getting the endorsement isn’t just an extra—it’s the only way to avoid a career-limiting restriction.
How Long Does It Take to Learn the Air Brake System?
Everyone learns at their own speed, but most students in a decent training program get comfortable with the air brake system in about one to three weeks. The real secret isn’t cramming—it’s consistent, hands-on practice.
The best way to nail it is to hit the CDL manual every day while also running through the pre-trip inspection over and over. You’re not just memorizing steps; you’re building muscle memory. Soon enough, the sequence and the pressure numbers will feel like second nature.
That kind of repetition is what separates someone who fumbles through the test from a driver who breezes through it.
Do I Need an Air Brake Endorsement for a Class B CDL?
Yes, absolutely—that is, if you ever plan on driving a Class B vehicle that uses air brakes. And guess what? A huge number of them do. We’re talking about dump trucks, school buses, garbage trucks, and many of the bigger straight trucks.
Even if your immediate goal is just a Class B license, getting the air brake endorsement is a no-brainer. It makes you a much more valuable and versatile driver in the eyes of an employer. It opens up a ton more job opportunities than a restricted license ever will. If you already have a restricted license and need to get it removed, you can learn more about removing the E restriction and taking that next step in your career.
What Happens if I Fail the Air Brake Test?
First off, don’t panic. Failing a CDL test is more common than you’d think, so don’t let it get you down. What happens next depends on which part of the test you failed.
- Written Knowledge Test: If you don’t pass the written portion, most states will let you try again. You’ll likely have a short waiting period and have to pay another fee for the retest.
- Skills Test (Pre-Trip Inspection): This one is a bigger deal. If you fail the hands-on air brake inspection, the examiner will stop the entire skills test right there. You’ll have to go home, reschedule, and pay for a whole new skills test from scratch.
Instead of seeing it as a failure, look at it as a very specific diagnostic report. It tells you exactly what you need to study and practice more. Take the feedback, hit the books, get back in the truck, and come back next time ready to ace it.
At Patriot CDL, we provide the expert, hands-on training you need to master the air brake system and pass your tests with confidence. Our experienced instructors guide you through every step, turning complex concepts into practical skills. Start your journey to a successful trucking career by visiting us at https://patriotcdl.com.